
I must apologise for not doing a tutorial as planned this week as I've been poorly ick ick so I will catch up with more stamping tricks and techniques as soon as I can!
Its taken a long time to get round to this because there were many duplicate entries. Just a quick reminder that we have a maximum of 3 entries per challenge rule as not everybody is a super fast crafter so it makes it fair all round. If you entered more than 3 cards in challenge 7 then anything after your 3rd entry is not counted, sorry. I've had to check, recheck and check again to make sure the numbers are correct and I make it 85 valid entries so here goes!
The winner of the Joanna Sheen £10 voucher is.....
 Which makes it Carolyn! It must be your lucky day because you've also been picked for the Top 3, well done you! Please email me your address :)
Our Top 3 choice for this challenge are in no particular order...
Carolyn - PMS etc
Well Done ladies and please grab yourself your blinkie in the side bar!
Also a very special mention to Scott, Ruby, Sophie & Rachel our younger crafters who've taken part in recent challenges. Its lovely to see young crafters and we hope to see more of you!
***************************************************
Okies onto Challenge 8 - Clear as Day.
What we'd like you to do is include some thing clear, transparent or translucent, something see through.
You can alter it so for example use inked acetate (it *was* see through now it aint!) or go the simple route and include clear sticky gems (My fav!!) Remember you can always colour in clear sticky gems with your promarkers/copics so they match your image ;)
Try making some fairy or butterfly wings from fantasy film or similar. There are lots of possibilities on this one so we can't wait to see what you come up with!
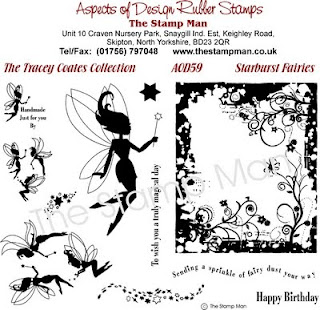
And the prize??? Ooooh I have a special treat for you! Some of you may know that I have been asked to join the Design Team over at The Stampman who sell some of the most amazing stamps and products, please go and check them out as its like Aladdins Cave!
One of their newer additions are a range of stamps by the talented Tracey Coates and the prize we're offering is to choose one of her 3 new plates. You can choose either Butterfly Beauties, Starburst Fairies or Classical Instruments it will be your choice! I love them all personally so I couldn't select one to put here so thought you might like the choice yourself! Also watch out for them on Create & Craft TV on 28th November!
As an extra treat I am also offering some Moonglow blog candy over at my Blog, pop on over to enter!

or


I ran a piece of acetate through the cuttlebug using the Happy Birthday Folder. Then I cut the front off of a card blank leaving a small section to stick the acetate to. I covered the inside of the card with paper from Papermania Sweet Nothings range and then stamped and embossed the central image twice, cutting out the central section to decoupage onto the base. I coloured the image with Whisper pens and Sakura pens

8" card blank, 3 shades of purple card for matt & layering, nestabilities for the circles, rub on sticker, double sided tape for the glitter borders, acetate wrap stuck down, butterfly stickers on the acetate.

I used a kit I bought from Studio (Religious Mini O4) this has 3 pieces which fold together, the first two had circles and are in silver an the inside of the card is white.
As I really didn't know how to use this type of card I drew round the circle so it that when I added the pieces on the inside of the card they could be seen through the circle in the 1st two pieces.
Next I put a piece of acetate between the 1st two pieces sticking it onto the card using double sided tape, and put another strip to hold the 1st piece of card inside.
The various pieces were then stuck in or near the circle & I added a gold fluorescent star between the two towers. On the cover, I added 3 stars in each of the top two corners and added an Anita's Seasons Greetings sticker

This challenge had my brain working overtime, i had a thousand ideas and didnt know what to pick, I used some hard cardstock and cut out a rectangle shape in the middle on both sides of the card. I then attached acetate to the front and the back, running up the middle is a pink ribbon which has three, shrinkle flowers on, i punched them out first and coloured them and then shrunk them down, I punched out several different coloured flowers and attached them to the front of the card and added glitter to beef it up a bit. thanks for looking


I used a kit I love which I purchased from QVC, it is a Kanban kit. The aperture cards came with it and just needed the centres popping out. I then cut and stuck the acetate in the middle of the card, the toppers are decoupaged but it is hard to photograph them, I then added the gems and snowflakes. It is a easy card to make from kit form but I really love them I think they are so cute.


I've used the Elzybells 'polar bear' teddy stamp, coloured with promarkers, with a chalked sky background. I used a sakura clear glitter pen on the little falling snowflakes and polar white flowersoft for snow. I've cut the image out with a Nellie Snellen circle die and the paper is Papermania 'naughty & nice Christmas'. I've used a Sizzix Bigz die to cut some acetate flowers (mainly because I couldn't get my snowflake die to cut through the acetate!), then added lots of glamour dust and some buttons, and finished off with a strip of pink & blue fibres.

I trimmed a card blank down leaving a 2cm strip at the front. I used a Fiskars punch to make a decorative edge. I ran a piece of acetate through a snowflake Cuttlebug embossing folder and used double sided tape stuck it to the inside of the overlapped front edge.
The paper on the inside of the card is a piece of wrapping paper from Paperchase. They do some fantastic metallic and flocked designs and around £1 to £2 for a massive sheet they are very good value too.
The large snowflake is a 2 step Cuttlebug die that punches and then embosses the shape. It is cut from Doodlebug flocked cardstock so feels like Fuzzy Felt :) The ribbon is a self adhesive one from Papermania, the gem is Paperchase and the sentiment is from Kanban.

I created an Easel card and the butterfly is Acetate. I don't know how well it shows in the photo. I took a couple of close ups that I will put on my blog. I used the Mimi image from Pink Petticoat Designs. I love these Easel cards, really fun to make!
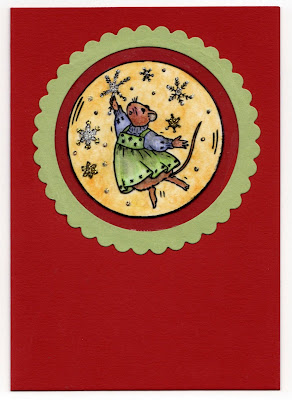
I stamped a Cute companion stamp from Christmas Magic set, the using black Memento Ink. Which I coloured in using watercolour pencils and add a chalk background to the bauble.
Then I stamped the same image using stazon on to acetate. Then added stickles to the snowflakes. I cut out a frame using a scalloped nestabilitiy die. I glued the acetate bauble to this frame.
I then matched up the coloured bauble up with the acetate bauble, then mounted it on to a red card.

For this challenge I have created my very first Easel card whoop whoop! They are soooo simple once you make the base you realise is that IT! I shall put destructions on my blog if you don't know how to make them. The papers I used are from Bearly Mine designer extreme volume III and I stamped Tracey's Butterfly from the Butterfly Beauties plate onto acetate, flipped it over and added some glamour dust to the back using a clear glue. I used the wing of the smaller butterfly to create the corners and also glamour dusted them. This was secured onto the backing papers with brads. The butterfly at the bottom was made by swiping a tri colour brilliance inkpad onto card and stamping and cutting out two butterflies, making the top one 3d.

EMAIL ENTRIES
JANINE Q


OOOh check this out by Janine Q who is in the process of starting her blog! I think she's going to do very well around blogland!
HELEN C
 Fab little delicate acetate card by Helen C, well done!
Beautiful cards DT ladies! You inspire me! This is such a fun challenge!
ReplyDeleteWell done DT there are some gorgeous cards there everybody does really well. x
ReplyDeleteWell done all, hope you all enjoyed it the results are great
ReplyDeleteThis comment has been removed by the author.
ReplyDeleteRight try again put wrong link in.
ReplyDeleteGreat DT cards and the prize this week is gorgeous.
My card is here
http://clarabellecrafts.blogspot.com/2009/11/crafty-cardmakers-clear-as-day.html
Sarah x
Great cards from the design team this week. The prize is wonderful.
ReplyDeleteDonna
Super DT cards!
ReplyDeleteI colored Dew Drops with my Copic's for this one!
Here's my card
I enjoyed this challenge, learnt to do something different. I did acetate snowflakes then glittered them. Here's my card
ReplyDeleteHappy crafting
Tracy x
Fab cahllenge and superb DT cards. Sorry my "clear" is a bit of a cop out but Iw as on a roll of 11 challenges with this card lol! Here it is .. thanks for looking
ReplyDeletePaulien x
This comment has been removed by the author.
ReplyDeleteDt cards are exscellent!!
ReplyDeleteHere is my entry.
Good luck everyone!
Great cards from the design team
ReplyDeletehope mine is ok
Here it is
Alison xx
Was a bit stuck on this one, but then I needed to do a card for my hairdresser, who is mad on Little Mermaid.
ReplyDeleteThis is what I came up with
Enjoyed this one. Gave me a chance to use my ProMarkers (love them), and my cuttlebug folder.
ReplyDeleteThis is what I came up with
Great challenge
ReplyDeleteHere is my card
:)
A great challenge -
ReplyDeletehere is my entry
Using acetate is always a great challenge, my new sweet treat cups came at the right time.
ReplyDeleteThanks for letting me play along.
Here's my entry
Fantastic DT work,
ReplyDeleteHERE IS MY ENTRY
Hugs
Angie
Sooooooo fab creations of the DT's!
ReplyDeletemy card is here.
Wow, I can't believe I made the top 3. Thank you so much! I love all the DT work, so varied and yet so stunning. This was a new one on me as I have never worked with acetate before. I found it fun though and you can see three cards here
ReplyDeleteBother! I couldn't get the link thing to work on my previous post. I will try again...hopefully you can see the cards here. If this hasn't worked you can see them here: http://carocrafts.blogspot.com/2009/11/more-good-news.html
ReplyDeleteLove the DT cards. I've used clear sticky jewels for my snowflakes.
ReplyDeleteHere's my card.
Kat x
Thank so much you for choosing me for top 3!!!
ReplyDeleteHugs, Anne
Hi there. I made a 3D frame for this weeks challenge.
ReplyDeletehere it is.
SuzyX
another card of mine is here.
ReplyDeleteAnother great challenge to get my teeth into, you sure make thing's interesting....
ReplyDeleteLovely DT card's and a fab prize for the lucky winner.
Heres mine http://peterjdan.blogspot.com/2009/11/look-no-copics.html
Vicky x
What a great challenge.
ReplyDeleteAll of the DT sample are just FANTASTIC!!!
Here is mine
Hi There,
ReplyDeleteLovely DT makes. Here is my Card!
Susie xx
Great work DT! I am at awe with you guys creativity. And the challenges are never hard to do! Thanks.
ReplyDeleteI have made this one with my mammy hope you like it My Card
ReplyDeletebrilliant cards from everyone - very impressed - xx judie
ReplyDeleteFab challenge and some amazing DT work.
ReplyDeleteAnyway, here is my entry
Hugs
Dawn xx
Great Challenge, love the inspiration you had for us.
ReplyDeleteHere is my card.
CLOSED!
ReplyDeleteEntries are...
1. Sarah
2. Katie
3. Tracy
4. Pauline
5. Cheryl
6. Alison
7. Sue
8. Gloria
9. Janine (email)
10. Itzuvit
11. Glennis
12. Beverley
13. Lilac Anglia
14. Li bee ti
15. Caro
16. Kat
17. Susan
18. Helen (email)
19. Libeeti (2)
20. Vicky
21. Nancy
22. Susie
23. Jodi
24. Sophie
25. Crafty Kitten
26. Kendra
I like "Judie" clear card its looking charming...
ReplyDeletePlastic Business Cards
Plastic Card printing
Plastic Business Cards